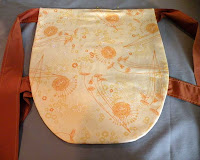
 I am still preparing for our new daughter’s arrival. I really wanted to get an Ellaroo hip carrier. I imagine happily carrying our new daughter around, on the left side so our left brains connect and we get the maximum bonding experience… But at $90 plus shipping, the Ellaroo is a little steep for me.
So I decided to make one myself.

I spent maybe an hour wandering around in my piles of fabric. Designing and redesigning the carrier. Though half my basement is piled floor to ceiling with fabric, I just didn’t have the perfect one. So I settled with a black pre-quilt. Guess you can’t go wrong with black. The fabric is water resistant which I think will come in handy later. I am pretty happy with how it ended up. But with no toddler to try it out, I don’t know if I need to tweak it. Maybe my neighbors will let me borrow theirs...
I am going to add a one handed buckle to the shoulder strap later. (Didn’t have one in the basement)

Materials:
1 yard of 60” width pre-quilted fabric
2” wide one hand release buckle
Sewing machine
Matching thread
Pattern:
Waist straps: 2 - 30”x5” (this fits up to 42” waist - add more length if needed)
Shoulder strap: 1 - 35”x10”
Front strap: 1 - 20”x5”
Body: 2 - 16”x18”

Directions:
Fold body in half vertically. Shave off top corner starting about ½ way up.
Fold straps in half lengthwise with right sides together, sew 3/8” seam allowance. Leave one side open.
Turn straps right side out.
Topstitch ¼” on stitched edges.
Place one body face side up on table. Pin open sides of straps to seam allowance with bulk of strap inside the body. Fold end of
 strap so doesn’t get caught in seam.
Pin other body piece over right side down.
Sew around outside of bodies, leaving a 10” opening at the bottom.
Turn carrier right side out.
Topstitch ¼” around body.
Thread shoulder strap through buckle and stitch down. Buckle should gather fabric to create a cup for shoulder to rest in.
Thread front strap through other end of buckle. Knot end of fabric around strap to secure.
To wear:

Tie straps around waist.
Place child in carrier with legs around your waist.
Pull up body of carrier and secure under one arm and around the outside of the other shoulder.
Gently test to see if child is secure. Adjust straps as needed to secure child.
I made a second carrier with Harmony Organic fabric. It came out beautifully. Next time I will interface the straps. I did interface the body. The straps feel a little flimsy, but the carrier folds up to a wonderfully small size.


2 comments:
Very nice! I'm glad to see that these can be made at home...I can't believe they charge that much for them! Thanks for the tutorial.
Very nice! I'm glad to see that these can be made at home...I can't believe they charge that much for them! Thanks for the tutorial.
Post a Comment