Friday, November 28, 2008

A-symmetrical Shibori scarf

A great way to use up that left over strip of fabric. Whenever I make a garment, I am left with a long strip of fabric. With this scarf I left the irregularity as part of the charm of the scarf. It can be an elegant, low-active-time, artistic gift.

Materials:
Strip of loose woven wool (about 60” or longer, can use full width of fabric – will shrink dramatically)
18-24 buttons – assorted sizes
Thread – strong coat weight
Washing machine
Dryer

Directions:
Wrap buttons in wool spacing variously or in straight line at about 3” intervals
Wrap thread around shank 3 times, pull tight and knot.
Wash whole thing 2-3 times in hot water
Dry high heat
Clip threads and remove buttons
Trim edges of fabric
No need to finish edges, wool threads knit together in hot water and won’t unravel

Dry clean only. Water will remove shaping.

Tuesday, November 25, 2008

Reuse popsicles

My son loves to open a juice box, take one sip and declare himself full, never to touch another sip. It drives me insane. What am I supposed to do with the remaining 7.75 oz.? I often stare enviously at his friends who finish the whole box.
I came up with this way to get him to eat the leftovers…

Organic frozen juice cups

Materials:
Opened juice box
2 small paper cups (we had some left over from his 3rd birthday party)
2 popsicle sticks (I have been methodically saving them all summer to mark the seeds in the garden.)
2 squares plastic wrap or waxed paper
2 rubber bands
4 pieces tape
Freezer

Directions:
Squeeze remaining juice into cups
Cover top of cup with plastic wrap or waxed paper
Secure with rubber band
Poke small hole in middle
Place stick through hole
Touch to bottom then raise ½ inch and secure with tape
Place upright in freezer over night

To remove from cup:
Remove plastic wrap, band and tape
Run lower outside of cup under running water
Do not get water inside cup
Gently giggle stick until whole thing pops out
May microwave up to 20 seconds if rock hard

Reuse all materials:
I keep open juice boxes in refrigerator and refill cups as they get eaten.

Friday, November 21, 2008

Tank top bag

A great way to give new life to old clothes or keep that adorable out grown outfit

Materials:
Tank top (woven or stiffer fabric works best)
6” x 20” piece of stiff canvas
Sewing machine
Scissors
Thread
2 – 8” to 10” sticks or pieces of bamboo (my neighbors grow bamboo along our property line. I just clip any sticking under the fence or out of the foundation…)

Directions:
Cut tank at shoulder seam
Fold over edges to leave 1” loop and stitch down
Cut base of tank at each side seam 2 ½” horizontally and 3” vertically
Using ½” seam allowance, sew together hem of tank
Open up corners and sew horizontal cut to vertical cut
Be sure to backstitch for strength
Turn right side out
Place canvas over inside bottom and stitch down to reinforce
Place sticks in each loop for handles

Now you are ready to carry or embellish

Monday, November 17, 2008

Fresh Sprouts

My son will only eat veggies he has picked from the garden. He won’t even eat veggies from the farmer’s market. I think he really enjoys watching his food grow and then harvesting it.
So as the winter comes closer and the garden is sparse, I worry. I wonder how I will get him through the winter.
Then I bought him some new underwear. Underwear is something I have to buy new, but only after he held up his favorite pair and counted “1, 2, 3, 4, 5, 6 … holes”. Then I realized it had been 2 years since I last got him new underwear. They must have grown with him.
The underwear came in this beautiful plastic clamshell.

Voila, inspiration for growing winter vegetables.

Materials:
2-3 tsp sprouting seeds – I used red clover because I had 5 lbs. leftover from last winter’s cover crop.
1 clear plastic clamshell
Water
Fine mesh sieve – I used one made for tea leaves.
Paper towel

Directions:
Place seeds in fine mesh sieve
Rinse until water runs clear
Cover bottom of clamshell with paper towel
Place seeds in shell
Be sure paper towel is damp but not soaked
Close clamshell
Place on window sill
If you have nice sills (I don’t) place a towel or plate under to protect
Wait 3-10 days to sprout
Enjoy fresh homegrown sprouts
Note: to have fresh sprouts all the time, wait a week and plant new clamshell. Then you can alternate and have a set growing while you are eating and then replant that one…

Thursday, November 13, 2008

Elementary school Holiday Bazaar

My son’s school is having a holiday bazaar. They will be selling donated stuff from 50 cents to $2. I think the goal is to enable the kids to buy gifts for all their family using their own allowance or money they earned themselves. The school gets the proceeds and it’s a win-win situation.
Ever since the announcement came home, I have been racking my brain to think of something simple yet fun to make. Something I wouldn’t mind getting as a present…
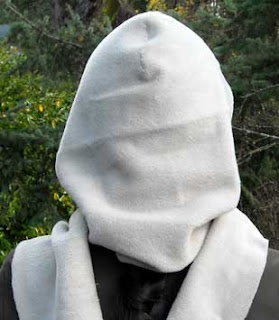
I live in a precipitous area. When it rains, I put my scarf over my head. My neck gets wet.
I came up with these fleece hooded scarves. They are so much fun to make. They take very little sewing. They use about ½ yard of 60” width fabric.

Materials:
½ yard double sided fleece
Scissors (rotary blade and mat if you have one)
Thread
Sewing machine
Large paper and ruler (optional – can draw directly on fabric) I used paper I got in a shipping package. You know the stuff they use instead of the awful peanuts.
Nice oversized hood with single seam down the middle

Directions:
Fold hood in half
Trace
Straighten line from mid-head to back neck
Draw line perpendicular to that line
Draw another line 6” above that line ending at front hood
6” parallel lines mark scarf
Now have rough shape for ½ of hooded scarf.
Fold fleece along grain line (selvage to selvage)
Place right angle of paper pattern on edge.
Cut the scarf to full width of the fabric.
Be sure not to cut center back neck fold.
Cut with a rotary blade and cutting mat if you have one, otherwise cut as carefully as possible with scissors. Try to get a smooth edge.
With sewing machine on zigzag mode, overlap center hood seam about ¼” and sew from center back neck to front of hood. Be sure to back stitch to secure.
Carefully clip all threads, excess seam allowance and selvages.


If you don’t want to do all the pattern work, for $5 plus $3 shipping I will make/send you a copy of my pattern.

Sunday, November 9, 2008

Story telling

My son loved story day at his preschool. Where they got to write stories and then the teacher would read them to the whole class. He misses it a lot. So I fixed up this book for him to write his own stories in.
I used red paper for his. Red is his favorite color.

Materials:
1 – 8 ½” x 11 piece of paper
Exacto blade
Glue, pens, stickers…

Directions:
Fold paper in half lengthwise
Open
Fold in half widthwise
Then fold in quarters widthwise
Open
Back fold creases.
Open
Slice center along crease line from fold to fold
Pop middle up and fold into 4 page book.

Have fun helping or watching child decorate book

Sunday afternoon playdate bread

My son had a play date over lunch time. Dilemma - what to feed two picky eaters. I remembered something we did in preschool. Pretzels. This recipe is simplified version of pretzels. I don’t boil them so I guess they are just rolls. I served them with strawberry preserve and sometimes my son sprinkles them with sugar crystals.
Normally, I have my son help me measure, pour and mix the dough, but I was worried about two boys in my small kitchen. So today, I pre-mixed the dough, let it rise and then called them over to shape the dough. The dough was a little sticky, so I had them shape it directly on the cooking pan.
I baked them, let them cool and sure enough, the boys each ate two. Served with a yogurt smoothie, cheese and apple slices, they were able to play another 1 ½ hours with no fights!

Materials:
1 cup warm water
1 package active dry yeast
1 tablespoon sugar
2 ¾ cups sifted organic whole wheat pastry flour
2 tablespoon soft butter
½ teaspoon salt

Directions:
In large bowl combine water, yeast and sugar
Let sit until dissolved
Add 1 ½ cup flour, butter and salt
Mix at least 3 minutes
Stir in remaining flour
Kneed until dough loses stickiness
Transfer to greased bowl and let rise until at least 2 time size.
Punch down and divide into 12 pieces.
Arrange into pleasing shapes (see my son’s shark image)
Place on greased baking sheets
Let rise until 2 times size (sometimes I skip this depending on how hungry they are)
Preheat oven to 475
Bake until crispy and browned, about 8-10 minutes.
Cool a few minute and serve.
Keep leftovers in airtight container for up to 1 week.

Thursday, November 6, 2008

Vine Scarf


I made this scarf from soft fleece leftover from my days in the apparel industry. These pieces were literally taken out of the pre-trash pile that was destined for the landfill

Materials:
2 - 6” x 60” piece of contrasting fleece or felted wool
Straight pins
Matching thread
Sewing machine with walking foot

Directions:
Pin fleece together about every five inches along the length.
Draw image on one side to follow with machine or freehand it.
Sew design on.
Cut away one side
Flip
Cut away remaining double side
Be careful not to cut all the way through both sides.
Clip away excess along edges.
Cut away all extra threads.

Tuesday, November 4, 2008

Rubber boot planter

Simple – free project

Materials:

Used child sized boot (I have never been able to throw away my son’s adorable boots, so I have dozens sitting under my work table).

Gravel or small rocks (I used old fish tank gravel that we had sitting on our back porch).

Potting soil (or dirt from the ground)

Rockery plants (I plucked some hens and chicks from our rockery)


Directions:

If boot has not cracked yet (unlikely since they seem to crack within 30 days of purchase) drill hole in bottom to release water.

Add gravel to bottom of boot, filling foot area.

Add potting soil to top of boot.

Gently insert plants.

Water

Set outside in garden.

Enjoy whimsical garden art.