Tuesday, March 31, 2009

Egg carton dragon

I set down with my son to make an adorable egg carton caterpillar that I found a great tutorial for. He was not happy. “Why would I want to make a caterpillar?” So I asked what he wanted to make. “T-Rex”
I said, “How about a Dragon?”
So I played around with some random materials I found in the house and here is what I came up with. My son thinks it looks more like a lion. I think if you painted it red it would look like a Chinese New Year dragon.
I also included pictures of what my son came up with.
I had to stop making mine, because he needed someone to “fight” his dragon.
Neither really survived the battle.

Materials:
1 or 2 empty egg cartons
1 or 2 pipe cleaners
Scissors
5 or 6 Cotton balls
2 googly eyes
Paint

Directions:
Cut empty egg carton down the lengthwise center to get 2 bodies.
Legs come from another egg carton high part between the eggs. Set with cups nestled inside.
Head is held on with pipe cleaner twisted through holes punched in carton. Tongue is end of that pipe cleaner sticking out.
Head is cup with corner cut off and reattached with 1” strips of pipe cleaner through hole and bent to secure. Secured part of another cup to back of head and glued ears on that.
Whiskers is pipe cleaner pressed through holes.
Hair is cotton balls carefully unrolled stripped and glued on.

Saturday, March 28, 2009

Pencil caddy

Quick and easy and useful craft

Materials:
Small paper shopping bag with handles
12 empty toilet paper rolls
Stapler and staples
Stickers/ pens/ crayons etc. to decorate

Directions:
Cut folded paper bag 4 ½ inches from top.
Cut 4 ½” inches from bottom.
Should have cut out about 1 ½” from middle
Decorate top half as desired
Open both halves
Place handled half over other half
Keep cardboard stabilizer on bottom
Staple top to bottom
Place toilet paper rolls inside, hole side up/down
Place pencils inside
Place on table, carry around with you or hand on wall
Can tape rolls to inside if need more stability

Tuesday, March 24, 2009

African stone game (Mancala)

I believe this game was originally played with small stones and shallow holes dug into sun baked earth. But here is a recycled indoor version. Great craft to reuse your old egg cartons

Materials:
Empty egg carton
Scissors
Pipe cleaner or yarn w/needle
Awl
48 large dried beans
Tape
Stapler/staples

Directions:
Cut lid and flap from egg carton
Cut 2-3 inch off each end of lid
Fold in sides of cut off piece of lid
Staple down with ends of staples on outside
Tape over sharp ends of staple
Repeat with other cut off section of lid.
Poke 2 holes in center of back edge of each altered lid
Poke 2 holes in short end of egg carton
Thread 1” piece of pipe cleaner or 5” section of yarn through holes
Tie or fold to secure

To play (2 players):
Place 4 beans in each egg cup
Players face each other with game board between the two players. Your collection cup (the larger compartment on the end) is to your right and opponent to the left.
Youngest player goes first.
Player removes beans from one egg cup on their side of the board. Place 1 bean in each egg cup starting at the right of that cup, including your collection cup. Continue around the board. Do not place one in your opponent’s collection cup.
If your last bean lands on your side, you collect all the beans in the cup opposite (on opponent’s side) of the last bean.
If the last bean goes in your collection cup take another turn.
Next player selects an egg cup on his side and continues depositing beans going counter clockwise.
Game is over when one side of board is empty.
Count tokens in collection cup. Object is to collect the most tokens.

Great at building counting and strategic skills

Friday, March 20, 2009

Puff eyes

I think in all the hub-bub of getting ready for the next child, that I have been neglecting my son. The other day he became adamant that he needed the “foam things that we glue”. When pressed for more description he said, “You know the ones that I used to use way back when I was three”.
In utter frustration, I dug up an old bag of foam packing peanuts and handed them to him. “No” he screamed, “the round white foam things.” So I pull out every craft item I have in the house, handing him anything white, round and foam…

Turns out he meant cotton balls.

Once we found that out, he sat right down and made this adorable little thing. I don’t know what it is. I think he was frustrated with me, because he said it was a gift for Dad and wouldn’t tell me what it was.

So this is a self guided craft since I haven’t been crafting much with him lately. I think he misses it. I will have to try to do more with him.

Materials:
Cotton balls
Glitter glue
Piece of paper
Foam sticker

Directions:
Glue stack of cotton balls together
Glue onto paper
Glue sticker on top
Dollop two “eyes” on sticker

I do love what he came up with. I think the eyes are so expressive and creative. Reminds me of the little worm creature in “spirited away”

Tuesday, March 17, 2009

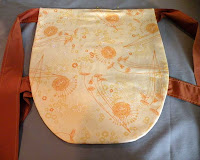
Baby Hip Carrier

I am still preparing for our new daughter’s arrival. I really wanted to get an Ellaroo hip carrier. I imagine happily carrying our new daughter around, on the left side so our left brains connect and we get the maximum bonding experience… But at $90 plus shipping, the Ellaroo is a little steep for me.
So I decided to make one myself.
I spent maybe an hour wandering around in my piles of fabric. Designing and redesigning the carrier. Though half my basement is piled floor to ceiling with fabric, I just didn’t have the perfect one. So I settled with a black pre-quilt. Guess you can’t go wrong with black. The fabric is water resistant which I think will come in handy later. I am pretty happy with how it ended up. But with no toddler to try it out, I don’t know if I need to tweak it. Maybe my neighbors will let me borrow theirs...
I am going to add a one handed buckle to the shoulder strap later. (Didn’t have one in the basement)

Materials:
1 yard of 60” width pre-quilted fabric
2” wide one hand release buckle
Sewing machine
Matching thread

Pattern:
Waist straps: 2 - 30”x5” (this fits up to 42” waist - add more length if needed)
Shoulder strap: 1 - 35”x10”
Front strap: 1 - 20”x5”
Body: 2 - 16”x18”

Directions:
Fold body in half vertically. Shave off top corner starting about ½ way up.
Fold straps in half lengthwise with right sides together, sew 3/8” seam allowance. Leave one side open.
Turn straps right side out.
Topstitch ¼” on stitched edges.
Place one body face side up on table. Pin open sides of straps to seam allowance with bulk of strap inside the body. Fold end of strap so doesn’t get caught in seam.
Pin other body piece over right side down.
Sew around outside of bodies, leaving a 10” opening at the bottom.
Turn carrier right side out.
Topstitch ¼” around body.
Thread shoulder strap through buckle and stitch down. Buckle should gather fabric to create a cup for shoulder to rest in.
Thread front strap through other end of buckle. Knot end of fabric around strap to secure.

To wear:
Tie straps around waist.
Place child in carrier with legs around your waist.
Pull up body of carrier and secure under one arm and around the outside of the other shoulder.
Gently test to see if child is secure. Adjust straps as needed to secure child.
I made a second carrier with Harmony Organic fabric. It came out beautifully. Next time I will interface the straps. I did interface the body. The straps feel a little flimsy, but the carrier folds up to a wonderfully small size.

Saturday, March 14, 2009

Hip Mama Diaper Bag

So what do you do when your husband of nearly 20 years thinks the product of the first time you follow a tutorial is the best thing you have ever created?


I have to agree the bag is beautiful. I followed a mingled yarn’s tutorial but made the bag smaller (2” shorter and 2” narrower, same depth). It took me a whole day (most of my projects only take an hour or two).


But the creative me is still a little sad…

Wednesday, March 11, 2009

Kindergarten art

My son did the greatest art project at school last week. He liked it so much he reproduced it this morning before going to school.
It’s fun and adaptable to all skill ranges. It’s great for practicing the small motor skills important to learning good penmanship.

Materials:
Large gray piece of paper
Dark marker
Crayons or pencils in many colors

Directions:
Instruct child to draw lines, squiggly and straight, all over the grey sheet with the dark marker.
Hand child crayons.
Then instruct child to cover all of the gray

My son loves red. So we get shades of red. But some of the girls in his class filled in each shape with a different color, ending with a Picasso like or stained glass affect.

Monday, March 9, 2009

Something different

I have been preparing to bring our new daughter home from china. Among the flurry of other things, I have been working on her life book. I made the images in flash, no they aren’t animated, but I find it easier to draw in that program. I seem to enjoy the malleability of computer art. I am very excited about this book. I decided to share it with other families. I call it “my first year home”.

This book highlights some of the significant events in a newly adopted child’s life. It is inspired by “Parenting your internationally adopted child”, Patty Cogen (A book I wish was around when I was a child)

Titles of pages:
My first year home
History
1st photos
1st day home
The day we left my birth country
My new home
Firsts
Past nurturer’s day (day before mother’s day)
Mother’s day
Past nurturer’s day (day before father’s day)
Father’s day
Family birthdays
My birthday
Anniversary
1st day home
Handover
The day we left my birth country
My adoption day
My life changes
What I know about my life

Note: 3 page photo (my life changes) is my favorite. It documents the Big Change of this child’s life. Patty Cogen recommends photocopying these 3 parts in the child’s life arranged on one page a dozen times and leave them around the house to normalize the child’s history and help explain the big 4 questions. What happened to me? Who will take care of me? Did I make this change happen? Will everything change again?
I really wish I had something like this when I was young.

Saturday, March 7, 2009

Saving packing paper for later projects

I spent a little time today rolling packing paper that came in a package. I am imagining all the future projects I can use this paper for.

We can decorate it for wrapping paper.
Potato print on it
Conventional stamp on it
Fish or leaf print on it
Fold it into giant airplanes
Plain old draw or print on it
Make forts with it
The list goes on…
Here’s to the wonders of creative play.

Wednesday, March 4, 2009

cheezy playdate pretzel

It seems like we have been having unending play dates. My son is on number 4 for this week. And it’s only Wednesday. He also enjoys epic play dates. Today’s is scheduled from 3:30 to 8, plus we had some much welcome drop in’s. Ever since I read Kingsolver’s local food book, I have wanted to try making pizza from scratch. But my son requested play date pretzels. So I did both. But I added cheese to the pretzels for extra protein and lowered the baking heat so the cheese wouldn’t burn. I think these would be really good dipped in the pizza sauce.

Materials:
1 cup warm water
1 package active dry yeast
1 tablespoon sugar
2 ¾ cups sifted organic whole wheat pastry flour
2 tablespoon soft butter
½ teaspoon salt
½ cup shredded cheese
Parchment paper

Directions:
In large bowl combine water, yeast and sugar
Let sit until dissolved
Add 1 ½ cup flour, butter and salt
Mix until combined
Add cheese
Stir in remaining flour
Kneed until dough loses stickiness
Add more flour if necessary
Transfer to greased bowl and let rise until at least 2 time size (at lease ½ hour)
Punch down and divide into 12 pieces.
Arrange into pleasing shapes
Place parchment paper on baking sheets
Place pretzels on parchment paper
Let rise until 2 times size (sometimes I skip this depending on how hungry they are)
Preheat oven to 425
Bake until crispy and browned, about 8-10 minutes.
Cool a few minute and serve.
Keep leftovers in airtight container for up to 1 week.